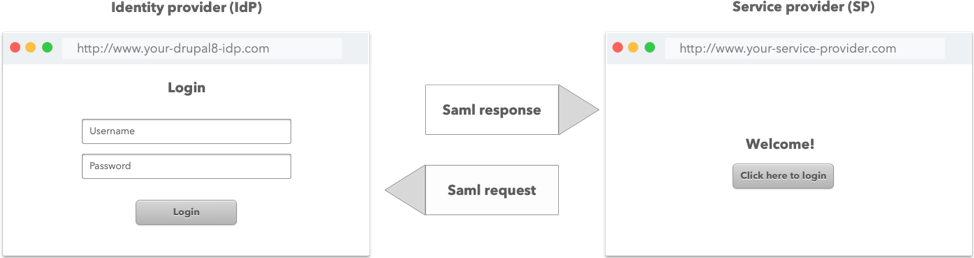
Let’s say that you have a collection of sites and instead of having a separate user database on each one, you want to manage logins from one centralized place, this is in essence what single sign-on means.
 There are a number of articles detailing how to implement the SAML 2.0 protocol, but if you want to host your site on Pantheon and use Drupal 8 as your identity provider, there are a few details to take in account.
What we were able achieve in the end, is a Drupal 8 site working as the identity provider and a ASP.NET site working as the service provider, that’s the best part about SAML, both sites don’t need to be written on the same language. You could even connect your IdP with Google Apps.
Requirements
1. Have a working Drupal 8 site.
2. Download the latest version of SimpleSamlPHP.
3. Download the Drupal module saml_idp (you’ll notice that this repo is a fork of this one this is because there were some changes necessary to make it work which are described here.)
The following tutorial assumes that you are on a linux based computer or a Mac.
Setting up SimpleSAMLphp
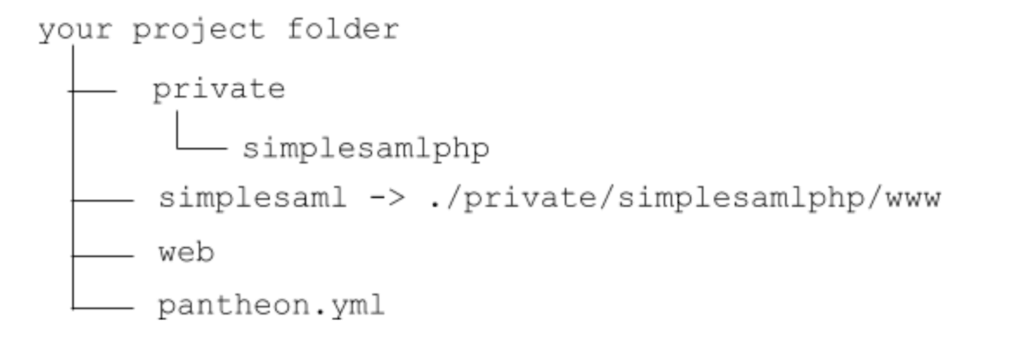
1- Place SimpleSAMLphp inside a /private folder
so the path is /private/simplesamlphp
In my case I also installed Drupal on the web subdirectory in order to have a cleaner structure.
2- Create a symlink on your project root
from /simplesaml to /private/simplesamlphp/www
ln -s ./private/simplesamlphp/www ./simplesaml
Your project structure should be as follow:
3- Add a virtual host for your project:
<VirtualHost *:80>
 ServerName local.myproject.com
 DocumentRoot "/var/www/myproject_com"
 SetEnv SIMPLESAMLPHP_CONFIG_DIR /var/www/myproject_com/simplesamlphp/config
 Alias /simplesaml /var/www/myproject_com/simplesamlphp/www
 ErrorLog "/log/myproject_com_log"
 CustomLog "/log/apache2/myproject_com-access_log" common
 <Directory /var/www/myproject_com/simplesamlphp/www>
  <IfModule !mod_authz_core.c>
   # For Apache 2.2:
   Order allow,deny
   Allow from all
  </IfModule>
  <IfModule mod_authz_core.c>
   # For Apache 2.4:
   Require all granted
  </IfModule>
 </Directory>
</VirtualHost>
Replace /var/www/myproject_com with your project folder location and local.myproject.com with your desired local domain name. Take in account that you’ll need mod_rewrite to be enabled. You’ll probably want to change the ErrorLog and CustomLog files locations as well.
4- Go to your drupal site and enable the saml_idp module
After this create the subdirectory /private/simplesamlphp/drupalauth and create an empty file with the name ‘default_enable’ in that directory in order to enable the Drupal 8 integration. You can also do this with Drush executing
drush ev 'Drupal\saml_idp\Install::postInstall()'
5- Copy the folder
/simplesamlphp/config-templates to /simplesamlphp/config and edit config.php
6- Ensure SimpleSAMLphp can keep sessions on Pantheon.
Add the following lines to the top of config.php:
if (!ini_get('session.save_handler')) {
  ini_set('session.save_handler', 'file');
}
7- Set up the rest of Pantheon specific settings.
Add the following last at the bottom of config.php:
if (defined('PANTHEON_ENVIRONMENT')) {
  $ps = json_decode($_SERVER['PRESSFLOW_SETTINGS'], TRUE);
  $host = $_SERVER['HTTP_HOST'];
  $db = $ps['databases']['default']['default'];
  $config['baseurlpath'] = 'https://' . $host .
  ':443/simplesaml/'; // SAML should always connect via 443
  $config['certdir'] = 'cert/';
  $config['loggingdir'] = $_ENV['HOME'] . '/files/private/log/';
  $config['datadir'] = 'data/';
  $config['tempdir'] = $_ENV['HOME'] . '/tmp/simplesaml';
  $config['store.type'] = 'sql';
  $config['store.sql.dsn'] = 'mysql:host=' . $db['host']
  . ';port=' . $db['port'] . ';dbname=' . $db['database'];
  $config['store.sql.username'] = $db['username'];
  $config['store.sql.password'] = $db['password'];
};
8- Change the following values on the same file (config.php):
A. technicalcontact_name and technicalcontact_email
B. secretsalt place any random hash here.
C. If you want the simpleSAMLphp administration page to be password protected, put the password you want to use on auth.adminpassword and change the values of admin.protectindexpage and admin.protectmetadata to true.
D. Put all the domains where this will be used on trusted.url.domains for instance array(local.myproject.com, dev.myproject.com, www.myproject.com)
E. enable.saml20-idp to true
F. store.type to ‘sql’
G. store.sql.dsn set your database connection string, for instance: ‘mysql:host=localhost;dbname=my_drupal_db’
H. store.sql.username and store.sql.password to your database credentials. This is just for your local machine, when this is running on Pantheon, these settings will be overwritten by the point 7 above.
9- Edit authsources.php and add the following below ‘default-sp’ block:
'drupal-userpass' => array(
'drupalauth:External',

// The filesystem path of the Drupal directory.
'drupalroot' => '/var/www/myproject_com/web',

// Whether to turn on debug
'debug' => true,
// the URL of the Drupal logout page
'drupal_logout_url' => $_SERVER['HTTP_HOST'].'/user/logout',

// the URL of the Drupal login page
'drupal_login_url' => $_SERVER['HTTP_HOST'].'/user',
),
And at the end of the same file:
/**
* Pantheon settings
*/
if (defined('PANTHEON_ENVIRONMENT')) {
$ps = json_decode($_SERVER['PRESSFLOW_SETTINGS']);
$config['drupal-userpass']['drupalroot'] = '/srv/bindings/' . $ps->conf->pantheon_binding . '/code/web';
}
10- Set up the IdP and SP metadata configuration:
A- Copy the files saml20-idp-hosted.php and saml20-sp-remote.php from /private/simplesamlphp/metadata-templates to /private/simplesamlphp/metadata
B- saml20-sp-remote.php contains your service provider settings, this is the site that will authenticate against this IdP, this metadata should be generated from the SP itself and will look something like this:
$metadata['http://local.spexample.org/simplesaml/module.php/saml/sp/metadata.php/default-sp'] = array(
'AssertionConsumerService' => 'http://local.spexample.org/simplesaml/module.php/saml/sp/saml2-acs.php/default-sp',
'SingleLogoutService' => 'http://local.spexample.org/simplesaml/module.php/saml/sp/saml2-logout.php/default-sp',
'NameIDFormat' => 'urn:oasis:names:tc:SAML:1.1:nameid-format:persistent',
'simplesaml.nameidattribute' => 'nameidentifier',
'simplesaml.attributes' => TRUE,
);
C- Edit saml20-idp-hosted.php and change auth to drupal-userpass and below that put the following block:
'attributes.NameFormat' => 'urn:oasis:names:tc:SAML:2.0:attrname-format:unspecified',
'authproc' => array(
  // Convert LDAP names to oids.
  100 => array(
    'class' => 'core:AttributeMap',
    'name2claimextend'
  ),
  2 => array(
    'class' => 'saml:AttributeNameID',
    'attribute' => 'uniqueIdentifier',
    'Format' => 'urn:oasis:names:tc:SAML:2.0:attrname-format:uri'
  ),
),

'userid.attribute' => 'uniqueIdentifier'
‘Format’ will depend on your SP settings, in this case is using ‘uri’ which is the most common, but it could also be set as ‘unspecified’ or any other supported format, for instance: ‘urn:oasis:names:tc:SAML:1.1:nameid-format:unspecified’
11- Now you need to create the certificate that will be used, this is a simply process:
First create the directory /private/simplesamlphp/cert and then open the console, go to that directory and execute:
openssl req -newkey rsa:2048 -new -x509 -days 3652 -nodes -out server.crt -keyout server.pem
12- In order for simpleSAMLphp to connect with the drupal module without issues, I had to edit /private/simplesamlphp/composer.json and add the saml_idp source folder to the autoload list:
Inside the ‘autoload’ section add
"classmap": [

"../../web/modules/contrib/saml_idp/src/Auth/Source"
]
Once this is done refresh the autoload files from the console executing composer dump-autoload in the same directory.
12- Edit your Drupal settings.php so the Drupal module can locate SimpleSAMLphp:
# Provide universal absolute path to the installation.
$settings['simplesamlphp_dir'] = $_ENV['HOME'] .'/code/private/simplesamlphp';
This is it, if all went well you should see the simpleSAMLphp admin screen on your browser now:
You can test your IdP directly from there going to ‘authentication’ > ‘Test configured authentication sources’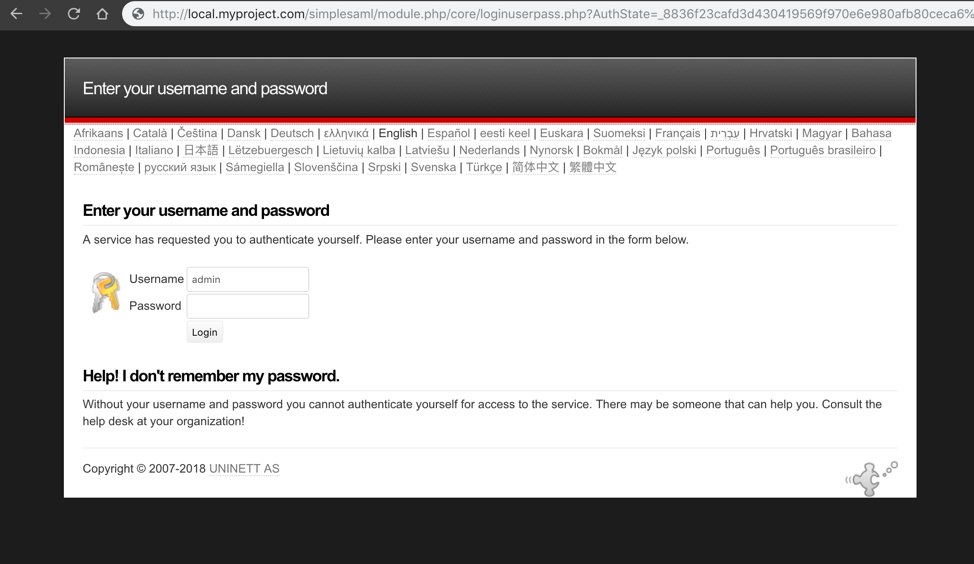
You can test your IdP directly from there going to ‘authentication’ > ‘Test configured authentication sources’

Resources and troubleshooting:
